
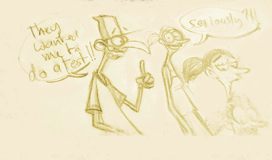
Pixar Brave, more concept art
Posted on August 30, 2011 |
4 Comments
Filed under Animation, Character design
Some more concept and visual development work for next year’s Pixar Brave has been shown to the public at Disney D23 last week.
I would have liked to see some Lord Macintosh designs just to finish the model I started a while back 🙁 The Wise woman is looking really cool.
[youtube]http://www.youtube.com/watch?v=Ky52jv5b-mY[/youtube]
Related post:
Brave concept art and teaser
D23 2011: A Conversation With The Pixar Creative Team Panel
Posted on August 29, 2011 |
Leave a Comment
Filed under Animation
If you couldn’t make it to Disney’s D23 event last week in Anaheim, here is a 1h30 recording of a panel with the Pixar Creative Team
[youtube]http://www.youtube.com/watch?v=_6t-VvTCgfc[/youtube]
You can find more articles on the Pixar Times blog
Via Pixar Times
Keith Ribbons
Posted on August 26, 2011 |
Leave a Comment
Filed under Animation, Friends
During a Paris AM gathering few weeks ago I realised that the current Animation Mentor students don’t know the work of some crazy graduates so I’d like to feature some of them.
Let’s start with my London based buddy Keith Ribbons.
Keith has worked at Sony Computer Entertainment Europe in London for a bit more than 10 years before taking AM and diving into commercials and TV work. He is currently at Blue Zook working on a TV series.
Check out his reel and short film or visit his Vimeo channel where he posts his WIP.
[vimeo]http://vimeo.com/15095349[/vimeo]
[vimeo]http://vimeo.com/19333493[/vimeo]
AnimSchool updates
Posted on August 25, 2011 |
2 Comments
Filed under Animation, Education
AnimSchool made some great announcements in the past few weeks and released some cool videos you might have missed in the craziness of Siggraph or just during your lazy summer.
To me and until now, AnimSchool was just some sort of “Blue Sky school” as most of the mentors are from Blue Sky and this would enable a quick comparison to an other school mentored by working professional animators for an other top studio, IAnimate, the “Dreamworks school”, but there is a bit more to it.
First, not all AnimSchool mentors are from Blue sky. AnimSchool made some changes to its blog which you will now find at the following url: http://www.animschoolblog.com/. (I think it would have been easier or more consistent to find it under blog.animschool.com or www.animschool.com/blog but it is always better than the previous url.

The new blog features some news related to the school, Animator’s interviews and mentors video critics. The latest one is from Pixar animator Mark Harris and I would highly suggest you to watch it as he is commenting on a typical 11seconds club entry that is well animated and rendered but lacking an underlying strong story. Watch it, it is really refreshing.
So AnimSchool has mentors from top studios which is a minimum requirement nowadays, and also teaches rigging and modeling. When finishing Animation Mentor, I felt graduates should be given the choice to pursue their learning and get some teaching in those two area and probably lighting too but this wasn’t an option. Instead, students are offered VFX related classes which is fine if one want to work in that industry, but some of us have no intention to join it and would rather make their own shortfilm. AnimSchool gives you that option.
What other announcement have they made? Well they also released a video clip extracted from one of the lectures the students are receiving and it looks really sweet! The animation examples are also provided to the students so they can study them in their 3d software. How cool is that?
[youtube]http://www.youtube.com/watch?v=FEBlYUepC6o[/youtube]
David Gallagher, the AnimSchool founder also made a live presentation on the school so we got to fully understand what is the drive behind the school.
The way things are going, a lot of previously keyframe animated project are now going the Motion Capture route. Motion Capture is great for that but what about for more stylised performances or unrealistic characters? What about a modern Goofy short film. How would you motion capture this?
[youtube]http://www.youtube.com/watch?v=YVsh9lymJsc[/youtube]
Obviously you can’t. AnimSchool seems to be teaching the exact art of making appealing cartoons and the examples shown are great demonstrations of that.
The rigs they are providing are also playing at a crazy framerate (close to 30fps). David didn’t explain what kind of CPU his machine used though, but he really emphasized the fact that framerate was one of his most important concern, and rightly so, this makes experimenting even more enjoyable.

The last crazy announcement he made was …. the release of Malcolm, one of their characters, to the public, for free!!! The rig will be free to use for any kind of project, even for professional work! There are obvious disclaimers but the “11seconds club” competition is a perfect example of recommended usage and I will certainly give it a go!

Related posts:
AnimSchool new trailer
“Skating away” short film
Posted on August 22, 2011 |
Leave a Comment
Filed under Animation, Animation Mentor
Few years ago, finishing Animation Mentor meant making short films! What better way to show your individuality than making your own shortfilm. To me, an animator’s goal should be to make short films rather than just making shots. Andrew Gordon expressed a similar feeling in a 2008 Splinedoctors’ blog post.
Here is a great shorfilm by abAutorig maker and animator, Brendan Ross, aka “Supercrumbly”.
[vimeo]http://vimeo.com/25147749[/vimeo]
Related posts:
abAutorig, Pyro tutorial Part 1
abAutorig, 5 minutes overview
Blender Sculpting tool
Posted on August 7, 2011 |
5 Comments
Filed under Education
If you ever wanted to try Zbrush but couldn’t afford it or were just put off by the interface, don’t despair! Blender comes to the rescue again!
Here are two really cool videos where you will be able to witness how awesome Blender, a FREE software is! This time you won’t have to listen to my silly comments or watch me looking for tools as a master modeler/sculptor will take you on a tour.
The first video is a sped up version of the second video, a teaser if you like. The second video is a 1h30 mins long sculpting walkthrough were you will be able to follow Roberto Roch and watch him work in realtime. Check this out, they are both in 720p!!!
[youtube]http://www.youtube.com/watch?v=7fxpQTO7f_w[/youtube]
[youtube]http://www.youtube.com/watch?v=B1DaPSV7isg[/youtube]
Blender Grease pencil
Posted on August 6, 2011 |
8 Comments
Filed under Animation, Education

Even if you are a regular Maya, 3dsmax or XSI user, I think you should check out the following videos as I am sure you will be able to find a use for Blender pretty fancy tools.
The first one I want to demonstrate today is the Grease Pencil, a nice feature that allows you to draw on the 3d viewport and write notes but also make quick thumbnails animation! Sorry for the low framerate, I realised it too late but will record an other animation example very soon.
As you will quickly realise, I don’t have much experience with Blender but I keep wanting to discover more, remember Blender is a free software and the developers keep updating it to make it more user friendly. Version 2.5 has integrated a lot of improvements and the software will get better and better from that point.
Towards the end of the first video I am getting a bit lost trying to find how to enable the Audio Scrubbing so feel free to jump to the second add-on video so I can avoid embarrassment 😉
[vimeo]http://vimeo.com/27356629[/vimeo]
[vimeo]http://vimeo.com/27358427[/vimeo]
To Blender experts reading this, how would you go about exporting the grease pencil notes/sketches to a video or even just an image sequence automatically?
So far I have two techniques that are not very user friendly but at least they work and will generate an image sequence which you can import into any 3d or editing software:
1. use a software like IrfanView to take a screenshot automatically every second and manually jump from frame to frame
Quickscreenshots might be an other simple alternative with an incremental saving hotkey CTRL + ALT + w http://code.google.com/p/quickscreenshots/
2. use the Blender Screendump function. Press CTRL + F3, press the + key to increment the file name and press Enter to Save.
[update thanks to Ljoel] Forget about all that exporting nonsense above, the solution is to use the OpenGLviewport capture 😉 Here is where you will find it

Anim Dailies
Posted on August 4, 2011 |
Leave a Comment
Filed under Animation, Friends

My friends Alfonso Sicilia and Andrea Castagnoli with three of their co-workers just set up Anim Dailies, a pretty cool webiste with a very simple premise: Five senior animators from top VFX studios, will have a look at your work and give you comments, for FREE!
There is no BS here, none of them got credited for work they never did and none of them are trying to fake some sort of expertise. Their Linkedin profile and their showreel is freely available so YOU know THEY know what they are talking about.
Several crits are already up on the website, go and have a look, submit your work and feel the love! 😉
Jing screencapture freeware
Posted on August 3, 2011 |
Leave a Comment
Filed under Education, Life hack
Jing is a really cool freeware from Techsmith that allows you to take screenshots or 5 minutes videos, add notes and automatically save them to your FTP server, Youtube, Facebook and other social website. In the process it also feeds your clipboard with the web server path information so you can share it with everyone immediately.
The compression is not always the strongest but it makes things so easy by automating entirely the whole process. It is a bit like Dropbox from what I understand, but without the privacy issues.
Here is a screenshot example using a great pantomime shot by Brad Kinley. No, no there is nothing wrong with your shot, that’s only an example Brad 🙂 I encourage everyone to check out his website, he has a great showreel and nice tutorials.

Setting up Jing to automatically copy the FTP information to the clipboard takes a bit of fiddling so I made a PDF to help you out.
“Dumber” July 11 secs club
Posted on July 23, 2011 |
2 Comments
Filed under Animation
I was supposed to attend the Paris Sketchcrawl today but the rainy weather put me off.
Instead I played around with the Morpheus rig as it allows for easy customisations so no two rigs look the same and many people recommended it to me.
The customisation options are pretty insane and surprisingly the character stays very appealing but I must say that I am not too happy about the facial rig which I am finding very limiting. The lips don’t give much freedom especially the bottom one and the geometry collapses on itself too often when hitting asymmetrical extreme poses. It is possible to tweak the blend shapes but I don’t really have time for that. The nose and ears controls are really cool though, I have never had that before.
Does anyone know where the head squash and stretch is? I just can’t find it!
Here is the blocking for this month 11 seconds club. I don’t intend to spend too much time on this piece as I just want to test Morpheus but let’s see where I am tomorrow evening.
[vimeo]http://vimeo.com/26806810[/vimeo]
I have gone a bit further and did a quick blocking + pass but I am not liking the mouth rig at all. Instead of thinking “what do I want to do?” I am finding myself pondering “what can the rig handle?”. Too bad it is a really cool rig, I will probably use it for background characters or physical test but not for close-ups anymore.
[vimeo]http://vimeo.com/26817601[/vimeo]
and Final!
[vimeo]http://vimeo.com/26844844[/vimeo]
-
Search
-
-
Links (mostly outdated)
- A Commentary
- Alberto Cerriteno
- Alfo S.
- Alison
- Andrea Blasich
- Andy Thomas
- Animation archive
- Animation mentor
- Anna Yamazoe
- Arte y Animación.
- Asifa Hollywood
- Avalanche Software
- Big Screen Animation blog
- Bobby Chiu
- Bonvoyage airlines - Bonvoyage airlines webdesign agency
- Box Office Mojo
- Brad Kinley
- Brandon Beckstead
- Brock Gallagher
- Brock-O-Rama
- Carmelo
- Cartoon Brew
- CGIndia
- Chad Sellers
- Char Blarg blog
- Character animation studio
- Character design blog
- Character design notes
- Chicken Toast
- Chris Davis
- Chronicles of an animator - David Martinez blog
- Conceptart.org - messy forum as usual but you can find some gems
- Deja View
- DJ - He is not a real DJ but that’s his name anyway
- DMCA
- DNA guys
- Drawn
- Enrico Casarosa
- Erlend
- FEED
- Feng Zhu
- Florian Satzinger
- Framefilter
- fxguide
- Golgoth13
- Henry Sanchez
- Jamaal Bradley
- Jason Schleifer
- JimHillMedia
- John K - this is not John Khars here but Ren and Stimpy John Kricfalusi. I am not too fan of the cartoon but
- Joost
- Keith Lango
- Kenny Roy
- Kris Staber
- Kris Staber
- leif jeffers
- Lines and colors
- Maciek Gliwa
- Manfred Ragossnig
- Mark Behm
- Martin K
- Matt Williames
- Mayerson on Animation
- Micha
- MichaelBarrier.com
- Mike Stern
- Milo
- Morgan Kelly
- Nikola Tamindzic - Party photographer
- Passion Pictures
- Peer Lemmers
- Rad How To
- Ray Chase
- Rebecca's blog
- Richie Prado
- Robert Barros
- Rok Andic
- Ross Burt
- Saddington & Baynes
- Sebastien Lasserre
- Spline Bomb
- Spline doctors - They are not really doctors but they will help you cure all your spline problems
- Spungella - Jean Denis Haas blog
- Stephen Silver
- Studio AKA
- Studio Soi
- Subdivision modeling
- Syndicat des producteurs de films d'animation newsletter
- TAG blog
- the A files
- The Art Center
- The art of Dave Pimentel
- The Berzerker
- The CA Blog
- the Plausible Impossible
- Timbo
- Timbo
- Toby Shelton - Dreamworks storyboard artist
- TWEAK!
- Uli Meyer
- Vincil
- Visual news
- Vulcan studios
- Wesley Louis
- WireImage
- Zbrush central
- Ziggy
