Since animation work is pretty scarce at the moment I have decided to put all my modeling work together just so I can apply to 3d modeling positions.
Those are props for a long overdue short film, personal work, professional work and character design studies. The work was done in Maya 2009 for the most recent pieces, 3ds Max 5 for the rest.
The Pixar related models are obviously fan art as I have never worked on Ratatouille or Brave. I only did those to get a better understanding of Pixar’s character designs, wireframe edge flow and rigging (articulations).
During a recent visit to French sculptor Bourdelle’s museum in Paris, I was reminded it is how the best artists learnt their art, by copying the masters. Michaelangelo was a great source of inspiration for Bourdelle, Daniel Lopez Munoz is mine.
You will probably find a timelapse video for most pieces in the “Related Posts” section at the end of the post and I would suggest their viewing to anyone wanting to learn about CG modeling and clean edge flow or just to see wireframes.
Few people wanted to see this guy animated so here it is. Believe it or not this was animated in Maya. I placed the walk cycle on a nurbs plane and animated the UV 🙂 I have been told I could have just used Photoshop. I will give it a try next time or maybe use Plastic Animation Paper since it is free.
Today we had one more amazing Animation Collaborative Character Design class.
This time, Albert and Chris brought Jason Deamer to give us a talk on Model Packeting. According to Al and Chris, Jason is the best artist for that kind of work at Pixar. Jason shared with us some of his Model sheets from Finding Nemo and we also saw some more from Up and the character Muntz in particular.
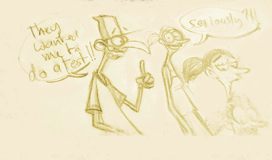
Here was the assignment I turned.
This is a rough “model packet” for one of the characters from my take on the “Wizard of Oz”. A “Wizard of Oz” that would take place in Siberia.
A model packet is a document that gets handed to the 3d modelers so they can take a design and turn it into a full 3d model. It can range from 5 to 18 pages depending on the complexity of the character or how much direction the modelers need.
There is nothing too complicated for that one but that was still pretty challenging. It is still very rough for the time being, I will post a cleaned up version very soon. Right now the arms and nose are not detailed enough for the modelers to do their job. The eyes also need to be worked out as they wouldn’t communicate eye direction. I will probably go for cartoony eyes like the last drawing.
I am currently working on a new showreel with two new acting shots but in the meantime, here is a showreel with my latest work.
[vimeo]http://vimeo.com/25508250[/vimeo]
The first shots are from Chico Chica Boumba, a TV series I worked on at 2minutes (Angouleme).
The second shot is a self directed acting shot in french as I am currently looking for work in France.
The third shot is a short extract from my short film “Summer time”.
The Robots shots are from the EA game “Spare Parts”.
And if you are interested, here are my Work in Progress
And an other progress reel for Spare Parts Cutscene 02b. That sequence followed Cutscene 02a during the game. The lighting is “In Game” and the shadows are baked or faked.
For that sequence I used the famous shot from Tim Burton’s “Mars Attack” and an other one from Dreamworks “Monsters vs Aliens”. (click on the thumbnail for an edited animation)
For the layout, I reused a run cycle I had done for in-game animation and quickly tweaked it so the character could come to a stop and restart. As you can see there is no offset in the cycle yet.
The idea at that stage was to convey that an entire army was getting ready for the fight and a long queue of enemy would go throught the suit-up machine. This eventually got ditched as I didn’t have time to animate all those guys reacting to what was happening in front of them. The rigs were also really really slow and I couldn’t get more than 2 of those guys in Maya at the same time.
After pitching the idea to the executive producer, he suggested that one of the characters would get his helmet the other way round to give a more comical effect. I was delighted as it meant I could have a bit more time and went a bit further by having the guy getting stuck to the machine.
The chair is missing here as Ross our concept artist was working on the final environment and I changed the colour of the tube to match the colour of the LCD screen in the previous shot. At that stage I had establish that the good guy would use a variation of blue colours and the bad guys a variation of greens, ultimately we went for purples in final.
If you pay close attention to the end of the shot, you will notice that the arms on the poor fellow have been inverted when he has his helmet the other way round. As the helmet and the arms were constrained to the same control, this was the only way I could achieve that effect. Talking about constraints, while in the air, I parented the upper body of the character to the transparent box you can see at the top to allow for the flailling legs and rotation of the main control without affecting the upper body. Originally the tube was supposed to be transparent and show that but when in game, we ran out of time to make it work.
“Spare Parts” came out last week and despite a lot of praise for the fancy graphics and ANIMATION the game didn’t get very good reviews among the hardcore game critics who weren’t too pleased to see a game renewing with the tradition with simple and fun action adventure games.
If you haven’t got an internet enabled Xbox360 or PS3 and didn’t get a chance to check out Spare Parts démo on PSN or XBLA, here is a “Gamespot Daily demo” where you will be able to get a glimpse of the actual game play, in-game music AND, for once, what EA normally hides for screenshot purposes, the fancy frontend graphics Kim created for the game.
Here we go, I am pretty much done with that shot. It is still in French but I added some subtitles for those who want to understand what this is about.
The audio clip came from a funny french candid camera show my friend animator extraordinaire and BYOA organiser Samy shared on Facebook.
In that clip the host was pretending to be a tattoo artist until, looking at the work he had started on their body, people realised with horror he didn’t know how to draw. Fortunately the needle was in fact a felt pen.
I really liked the audio as it couldn’t get more genuine, presented with an opportunity for a “take/gear change” and allowed for something broad without looking overanimated.
The original character was standing fairly still but I believe entertainment doesn’t come from under-animation or over-animation but instead in stylised choices situated at the edge of both. A good showreel should demonstrate understanding in broad and subtle acting. This will be my broad piece.
I will leave it in playblast for now and do a full render if I do an other pass. My goal wasn’t to have the best shot ever but just to get more experience with some of the concepts I rediscovered studying “the work of the masters” few weeks ago and hopefully get a junior or even a regular animation job in a french feature animation studio.
For the technical nitty gritty, I used my world orient FK spine again, world orient head and arms. I really like that workflow as it allows me to work in a layered method and keep adding levels of detail even when in polish. For my next close up shots I will be using an IK spine instead but I am still unsure how Bishop handles that.
For the nose I did something a bit fancy that I think is participating to make the face look more organic. In real life, if you observe people talking you will notice that the tip of their nose, nostrils and cheeks keep moving up and down following the opening and closing of the mouth.
Bishop has cheeks controls but with my custom nose, moving the nose control up and down wouldn’t have looked realistic. The skin of the face doesn’t just move up and down shifting the nose, it actually slides over its cartilage and the skull, causing a stretch of the soft parts of the head. (the ears also move actually)
Instead, I created a custom blend shape where the side and lower part of the nose came down simulating the pull of the skin according to the opening of the mouth. The effect is very subtle right now and I would have liked to push it further but after breaking the rig several time and using up few evenings with technical things I think this will do for that shot, time to move on, I think it is a nice close up shot with very stylised facial animation.
There is probably one frame of overshoot missing for the tip of the index and possibly a need of overlap for the other fingers but the next shots will be much harder to polish so let’s call that one DONE!
The lighting is temporary, I am now using Mental ray and this is foreign territory for me. A lot of testing and research will be necessary.
The Area light simulating the sky has been switched to a direct light to get a more realistic look but causing the loss of the soft shadows. I don’t know how to use depth map shadows in Mental ray yet. I will also try to frame the skeleton’s shadow a bit better and brighten it in the next pass. It would also be nice to get the guy’s hand shadow come into screen before the actual hand to prepare the audience for what is coming next.
Ah, I havent used any global illumination or occlusion yet, this requires much more testing than I have time for at the moment, my priority is to finish the animation before Xmas and have an amazing showreel for january 1st.
Regarding the materials. I am using a quickly customised misss_fast_sskin for the guy’s hand. It works fine for that shot but not for the next ones. I have in mind something similar to what they did on “Tangled” (gorgeous movie) or what Malcon Pierce used on his AM short film.
A tweaked leather procedural material has been applied as a bump map to the skeleton to give the feeling of a weathered material, this only shows in Full HD. I will probably need to add some 2d textures to create more dirt on the lower part of the skeleton unless I could use a procedural gradient, is that possible?
For the cinematography, I am wondering if I will use a cross fade at the begining then use a slowly focusing camera or maybe a slight pan, truck in…. we will see.
Ah ah!!! I was about to forget! I have in mind to have a shredded piece of cloth around the shoulder of the skeleton, some sort of bright blue hawaian shirt but I am not too sure how to go about it yet. A cloth simulation and a shredded looking opacity map could do the trick but I don’t know how Mental Ray handles opacity map with Depth map shadows.
[update]I am back to raytraced shadows and the cloth simulation was much easier than I thought 🙂